go seven !

SoftEther VPN auf dem Raspberry Pi

Wie man auf dem Raspberry eine PPTP-VPN Verbindung einrichtet, habe ich ja schon beschrieben. Nun ist diese Lösung nicht besonders sicher, wie von euch schon korrekt bemerkt wurde. Deswegen möchte ich eine nicht minder benutzerfreundliche aber sichere Methode anbieten. Dazu wird die Software “SoftEther” verwendet. SoftEther steht für Software Ethernet – es bietet also eine Software-basierende Ethernetschnittstelle.

Es stehen keine Pakete bereit, also kompillieren wir selber:

wget http://www.softether-download.com/files/softether/v4.03-9411-rtm-2014.01.07-tree/Linux/SoftEther%20VPN%20Server/32bit%20-%20ARM%20EABI/softether-vpnserver-v4.03-9411-rtm-2014.01.07-linux-arm_eabi-32bit.tar.gz

Dann wird dekromprimiert:

tar zxvf softether-vpnserver-v4.03-9411-rtm-2014.01.07-linux-arm_eabi-32bit.tar.gz

Wechsekn dann in das Verzeichnis und kompillieren:

cd vpnserver
sudo make

Dann kopieren wir das Programm nach /usr/local/ und machen es ausführbar:

cd ..
sudo mv vpnserver /usr/local
cd /usr/local/vpnserver
sudo chmod 600 *
sudo chmod 700 vpncmd vpnserver

Dann testn wir per

sudo ./vpncmd

ob alles geklappt hat. Wir wählen 3 aus und lassen alles durchlaufen. Mit exit verlassen wir vpncmd und legen einen Autostarteintrag an:

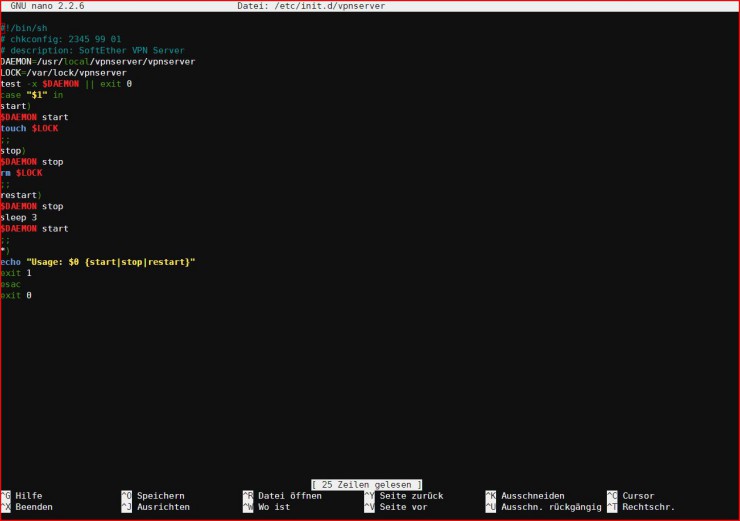
sudo nano /etc/init.d/vpnserver

Darin soll folgender Text stehen:

#!/bin/sh
# chkconfig: 2345 99 01
# description: SoftEther VPN Server
DAEMON=/usr/local/vpnserver/vpnserver
LOCK=/var/lock/vpnserver
test -x $DAEMON || exit 0
case “$1” in
start)
$DAEMON start
touch $LOCK
;;
stop)
$DAEMON stop
rm $LOCK
;;
restart)
$DAEMON stop
sleep 3
$DAEMON start
;;
*)
echo “Usage: $0 {start|stop|restart}”
exit 1
esac
exit 0

Aufzeichnen

Und machen das Ganze ausführbar und aktivieren und starten es:

sudo chmod 755 /etc/init.d/vpnserver
sudo update-rc.d vpnserver defaults
sudo /etc/init.d/vpnserver start

Jetzt können wir das Setup durchlaufen. Am besten nehmen wir die Defaults und setzen ein neues Passwort.

sudo /usr/local/vpnserver/vpncmd

Dazu wählen wir 1. Eventuell muss noch ServerPasswordSet eingegeben werden.

Jetzt kann von der Downloadseite der Servermanager und der Client heruntergeladen werden. Der Rest ist selbsterklärend 😛

Raspberry Pi – Finales Boardlayout fertig…

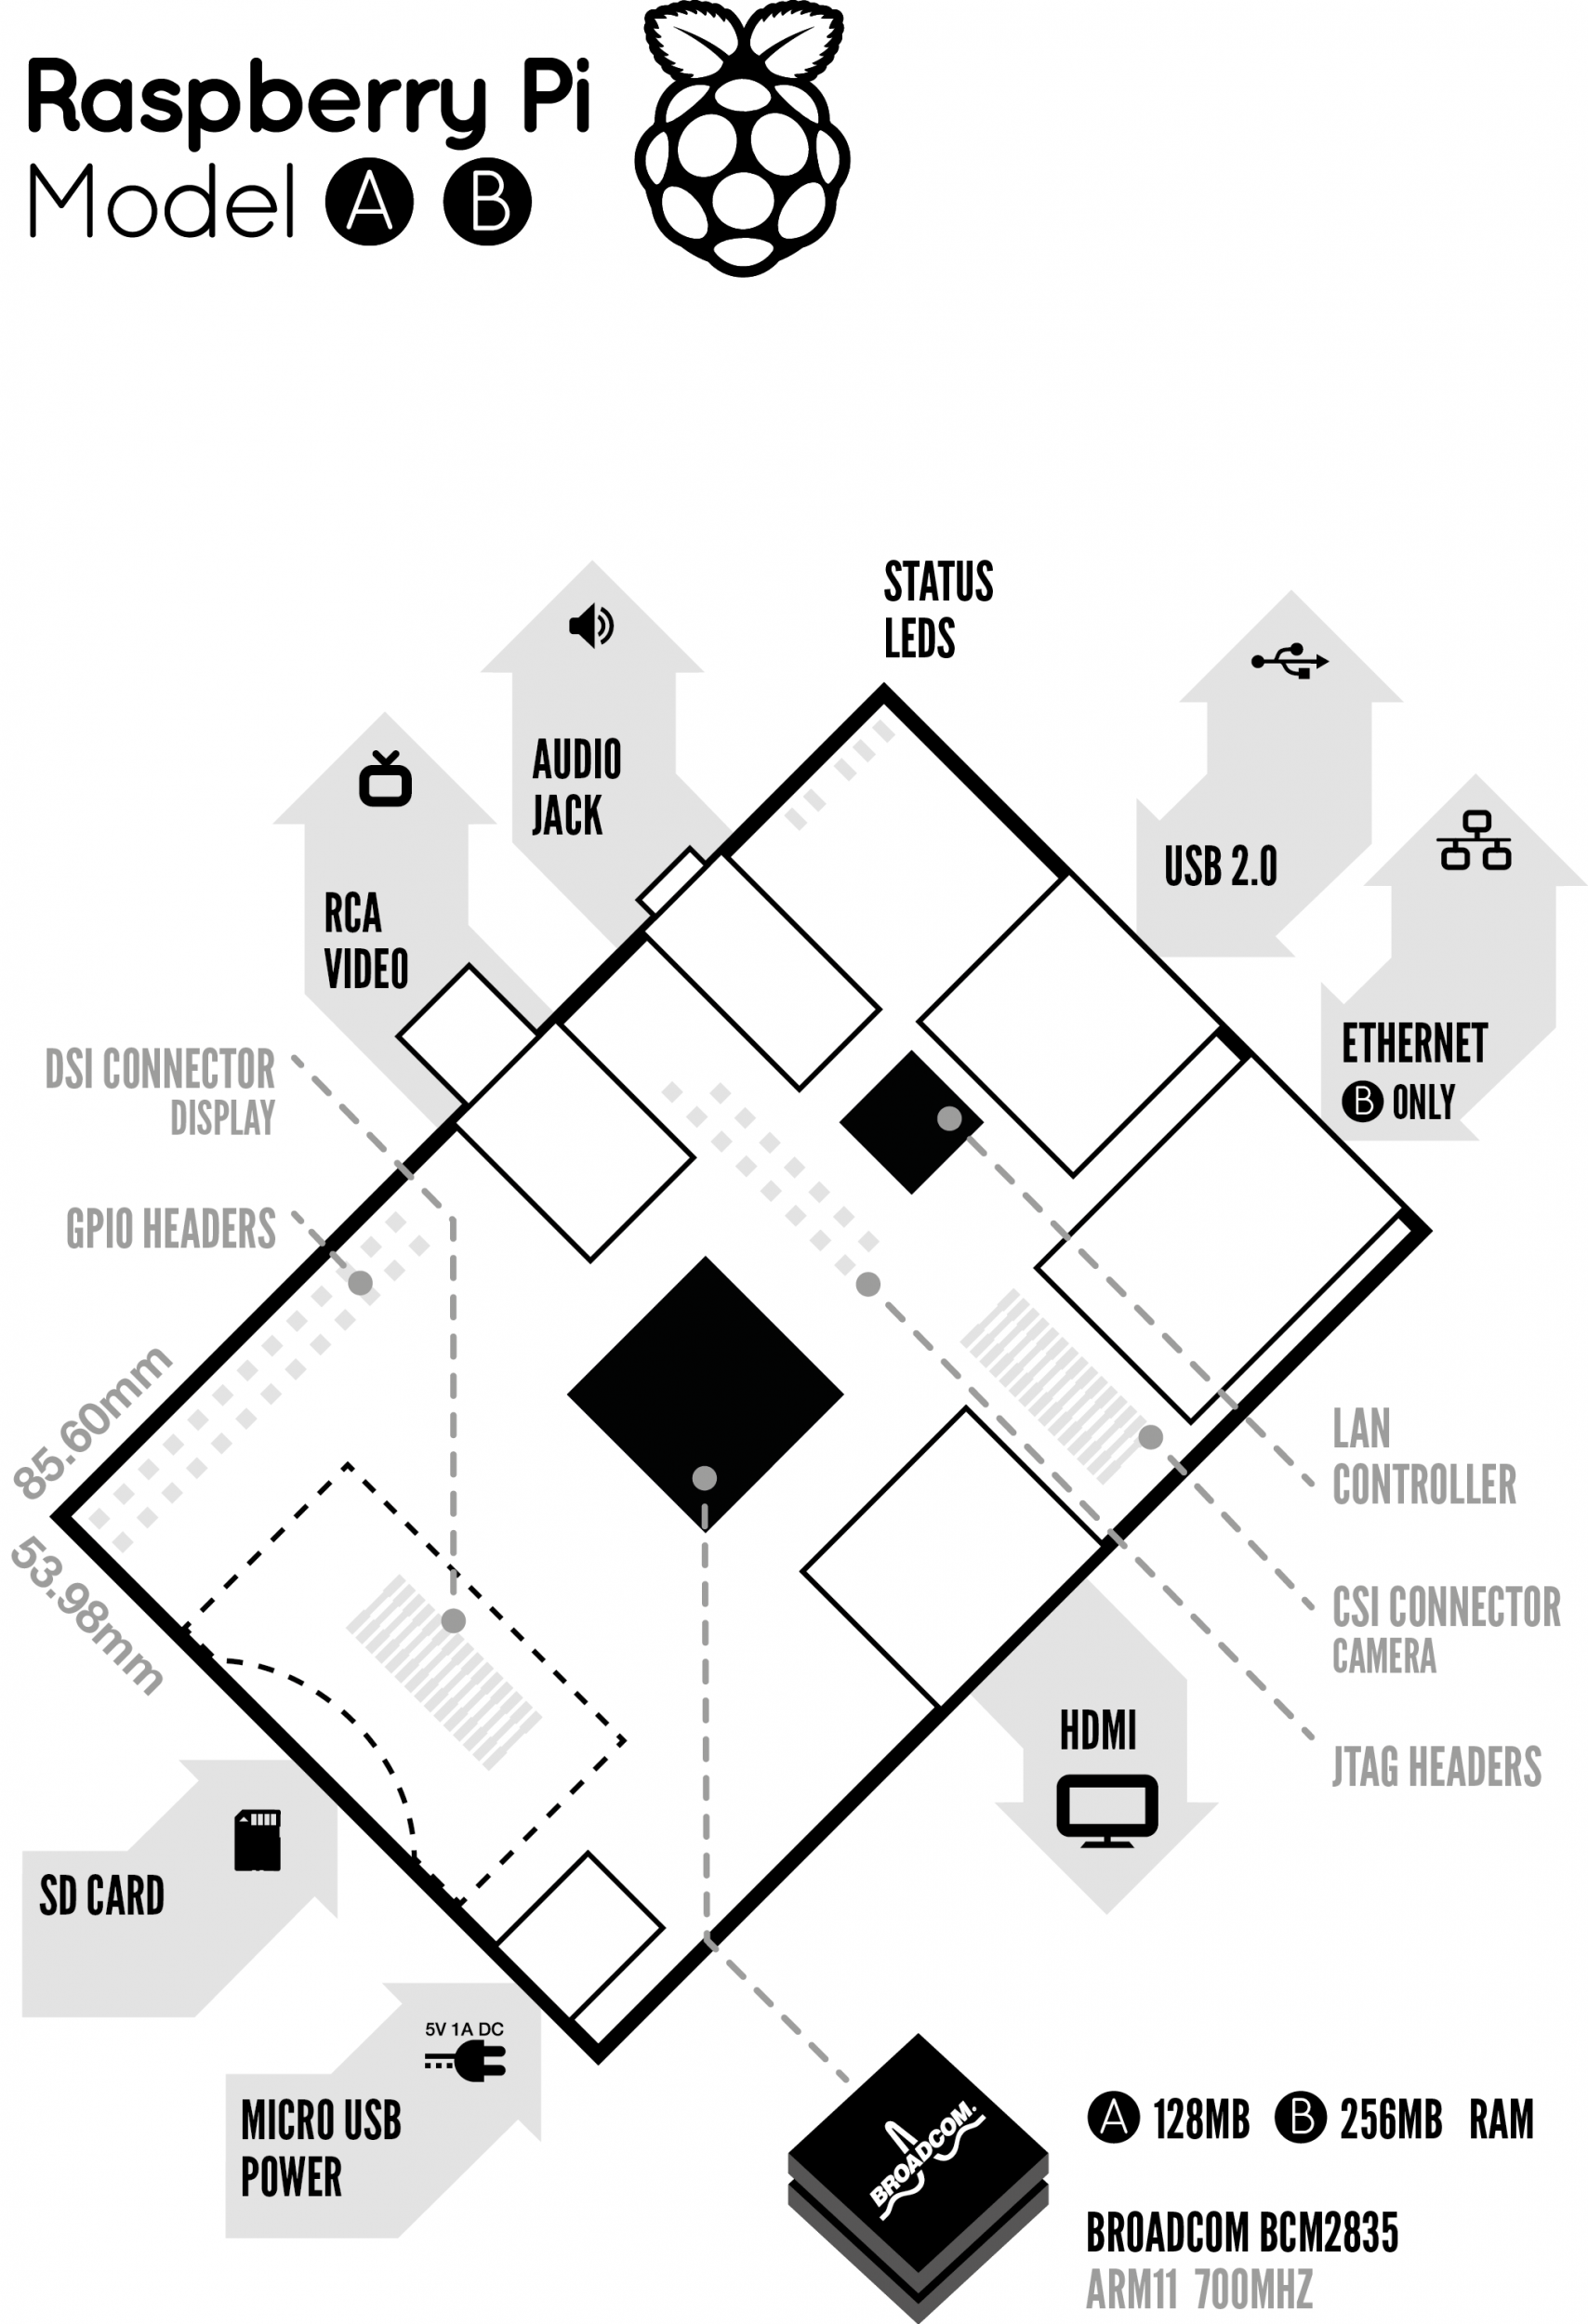
…es wird ernst um den Micro-PC Rasperry Pi. Das endgültige Layout der Board wurde gerade veröffentlicht und nun kann man davon ausgehen, dass es ncihtmehr lange dauert, bis die kleinen Hammergeräte für alle verfügbar sind. Das Layout:

Und nochmal die Daten:

Hardware Board A

  • 700MHz ARM11 Prozessor
  • 128MB SDRAM
  • OpenGL ES 2.0 Unterstützung
  • 1080p30 H.264 Decodierung
  • Composite und HDMI Videoausgang (HDMI mit Audio)
  • 2x USB 2.0
  • SD/MMC/SDIO Speicherkartensteckplatz

Hardware Board B

Hardware:

  • 700MHz ARM11 Prozessor
  • 256MB SDRAM
  • OpenGL ES 2.0 Unterstützung
  • 1080p30 H.264 Decodierung
  • Composite und HDMI Videoausgang (HDMI mit Audio)
  • 2x USB 2.0
  • SD/MMC/SDIO Speicherkartensteckplatz
  • 10/100 MBit Ethernetschnittstelle

Homepage (english)

Die Preise liegen bei 25$ für Board A und für 35$ für Board B. Das sind derzeit 18,90€ und 25,60€… Nichts von Welt also. Versand kommt aber noch drauf. Massenbestellung lohnt also. Ich werda auch eine Massenbestellung organisieren, hier könnt ihr euch schonmal eintragen. Die Daten werden natürlich vertraulich behandelt und ich schlage keinen Profit daraus, abegsehen davon, dass ich auch weniger Versand zahle…

PT

Raspberry Pi – MicroPC für Schulzwecke und Bastler

700MHz ARM11, 256MB RAM – Das klingt wie technische Details zu einem aktuellem Android Smartphone. Doch spätestens bei OpenGL ES 2.0, USB 2.0 oder Composite and HDMI video output fängt man an aufzuhorchen. Denn was man hier liest ist kein Motherboard für ein Handy – sondern für einen Spezial-Micro-PC für 25 $. Dieser kleine Geselle mit den Ausmaßen einer Kreditkarte soll noch dieses Jahr auf den Markt kommen.

Wie schon erwähnt soll er speziell für Schulprojekte eingesetzt werden – und im ULTRA-LOW-COST-Bereich wird sicher auch ein Platz frei sein. Aber was zeichnet diesen vollwertigen PC aus?

Hardware:

  • 700MHz ARM11 Prozessor
  • 128MB oder 256MB SDRAM
  • OpenGL ES 2.0 Unterstützung
  • 1080p30 H.264 Decodierung
  • Composite und HDMI Videoausgang (HDMI mit Audio)
  • USB 2.0
  • SD/MMC/SDIO Speicherkartensteckplatz
  • Optional integrierter 2-Port USB Hub und 10/100 MBit Ethernetschnittstelle

Software:

  • Ubuntu / Debian
  • Fedora
  • ArchLinux
  • –> Alle Programme in den Repositys

Website: raspberrypi.org/

PT

Neues RaspberryPi Modell A+ (A plus)

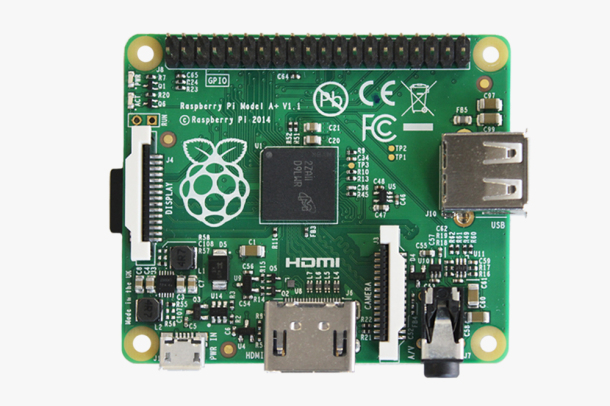
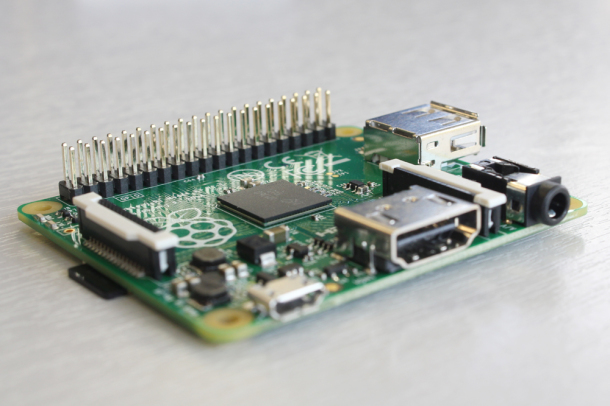
Liebe RaspberryPi Fangemeinde, es gibt ein neues Modell. Nachdem im Juli das Modell B+ angekündigt wurde, gibt es nun bald das Modell A+. Dieses besticht unter anderem dadurch, dass es noch kleiner ist und noch günstiger.

A-plus_Overhead

Features:

  • Mehr GPIO. Es gibt nun 40 statt 26 Pins, die alten 26 sind kompatibel
  • Micro SD, statt SD. Steht nicht hinüber hinaus, leichter zu installieren…
  • Verbessertes Audio, durch Low-Noise-Netzteil

Das Modell kostet jetzt nur noch 20$ (werden wohl 20€) satt 25$. Finde ich gut. Und die Größe reduziert sich auf 86 x 65 mm. Sobald man es kaufen kann, werde ich hier wieder informieren!

A-plus_3

via

Freier Grafiktreiber für den RaspberryPi

Endlich ist es soweit! Ein freier Grafiktreiber für den Raspberry ist verfügbar. Momentan muss man dazu aber noch den Kernel selber compilieren:

SETTING UP THE DEVICE

You will need:

  • a Raspberry Pi, preferably a 512MB version, with the latest Raspbian
  • a network connection
  • a monitor capable of displaying 1080p
  • an SD card, at least 8GB (10GB is recommended)

We need plenty of space to build the kernel. Compiling will take around 12 hours, so it is helpful to overclock the Pi for this task. We also require the latest firmware, and the necessary packages we’re going to use to build the code.

Note: We’re going to use gcc 4.7, as the code generated is 10% faster than with 4.6. 4.8 is 10% faster still, but this is not available on Raspbian. If you cross-compile you can get better frame times.

Enter the raspi-config utility with:

sudo raspi-config

Expand the filesystem, set the overclock to at least medium (900 MHz), and reboot. Now perform an update with:

sudo rpi-update

and reboot again. We need to install several packages. Enter the following command to do this:

sudo apt-get -y install gcc make bc screen ncurses-dev g++-4.7 libsdl1.2-dev

FETCHING THE SOFTWARE

Enter the following commands to retrieve the necessary software from GitHub:

git clone --depth=1 https://github.com/raspberrypi/linux.git
git clone https://github.com/simonjhall/challenge
git clone https://github.com/simonjhall/dma
git clone https://github.com/raspberrypi/quake3.git

BUILDING THE KERNEL

This will take around 10 hours with all kernel modules. Pruning the modules to the bare minimum can improve compile times if you wish. Enter the following commands:

cd linux
git apply ~/challenge/kernel/patch.diff
zcat /proc/config.gz > .config
make oldconfig
make menuconfig

Enter “general setup”, select “local version”, enter the string “simon” and then exit to the main menu and save. Now build the kernel with:

make ARCH=arm

INSTALLING THE KERNEL

Enter the following commands to install the new kernel:

sudo make ARCH=arm modules_install
sudo cp arch/arm/boot/Image /boot/kernel_simon.img
sudo su
echo kernel=kernel_simon.img >> /boot/config.txt
echo gpu_mem=128 >> /boot/config.txt
reboot

When the devices comes back up, verify that the new kernel is loaded with the following command:

uname -a

You should see something similar to this:

Linux raspberrypi 3.10.33simon+ #1 PREEMPT Sat Mar 22 09:49:59 UTC 2014 armv6l x

BUILDING THE REST

Enter the following commands to build the rest of the software:

cd ~/quake3
git apply ~/challenge/quake/patch.diff
./build.sh
cd ~/dma
cp ~/challenge/kernel/module/dmaer.c .
make
./install.sh

Next, verify that the module has installed with this command:

tail /var/log/kern.log

You should see something similar to this:

Mar 23 15:22:45 raspberrypi kernel: [ 20.814750] smsc95xx 1-1.1:1.0 eth0:lin1
Mar 23 15:22:45 raspberrypi kernel: [ 21.376702] bcm2835-cpufreq: switching td
Mar 23 15:22:45 raspberrypi kernel: [ 21.376710] bcm2835-cpufreq: switching td
Mar 23 15:22:46 raspberrypi kernel: [ 24.472575] Adding 102396k swap on /var/S
Mar 23 15:25:02 raspberrypi kernel: [ 143.984835] 20c00000 f2c00000 deadbeef
Mar 23 15:25:02 raspberrypi kernel: [ 143.984866] major device number 248
Mar 23 15:25:02 raspberrypi kernel: [ 143.984890] vma list size 12, page list 6
Mar 23 15:25:02 raspberrypi kernel: [ 143.984909] allocated dma channel 4(f208
Mar 23 15:25:02 raspberrypi kernel: [ 143.985242] qpu ENABLED
Mar 23 15:25:02 raspberrypi kernel: [ 143.985264] V3D identify test: V3D versi2

Now enter the following commands:

cd ~/challenge/source
make
sudo make install

SETTING UP THE GAME

First of all you must ensure that you have the Quake 3 Arena data files on your Pi. You require the ‘point release’ pak files installed. There are various ways to do this but you could either transfer them from another machine with SCP, or copy them across on a USB stick. Copy the files into a folder called ‘baseq3′. This should now contain pak files numbered from 0 to 8 (eg pak1.pk3).

Next, enter the following commands:

sudo mkdir /root/.q3a
sudo mv baseq3/ /root/.q3a/
cd ~/quake3/build/release-linux-arm/
sudo mknod char_dev c 100 0
sudo cp ~/challenge/quake/demo.cfg /root/.q3a/baseq3/

RUNNING THE GAME

Enter the game folder with the following command:

cd ~/quake3/build/release-linux-arm/

Run the game using this command:

sudo ./ioquake3.arm +exec demo

If you wish to play the game after a reboot, you must run the following commands to re-load the necessary files:

cd ~/dma
./install.sh

Ich werde das Ganze demnächst auf deutsch anbieten – momentan probiere ich es aber noch selbst aus – was ja bekanntlich etwas dauern kann, auf dem Pi. Cross-compiling werde ich dann auch noch anschneiden… Viel Spaß euch mit Quake 3 und dem Pi!

7462_full